Maintaining data via export-import
Maintaining data via export-import
In particular, when you need to edit or create many products at once, using the Excel import is helpful. With this feature you can comfortably modify data in Excel and then re-import into the portal. Before import, the portal checks which changes you have made. You can review these changes and decide which ones you finally want to apply in the portal.
Procedure for maintaining data via Excel import: * First, select the products to change. * To do so, place the affected products into the “Download List”: * You can do this one by one, or all at once by setting the appropriate filters (see illustration). * You can at any time add or remove products from the “Download List”.
 \Image 43: Adding products into the Download List
- Next, go to the Download List via the User Menu on the right side.
- There you see all products added to the list. You have the option to freely determine which fields/attributes to export.
- For this, select a template in the lower-left corner; you can edit it and then save it as a new template.
 \Image 44: View of the Download List
- Editing the template is done by simple drag & drop of fields between available fields (on the right) and export-designated fields (on the left). In this interface you can also search or select/deselect all fields.
 \Image 45: Creating / editing a template for the Download List
- Next, you see the defined fields for the selected products in the overview.
- From there, start the export. Please ensure you have selected “Export for Import” if you intend to modify the exported data and then re-import into the Edit Portal.
 \Image 46: Starting the download for editing and later import
- In the next illustration, you see the typical structure of the file exported by the Edit Portal.
- It contains, in the “Download-Tabelle” sheet, the selected fields. Several other sheets exist, explained below.
\Image 47: Starting the download for editing and later import
Structure of the Excel sheets
After you have selected the desired products and fields to edit (and checked “Export for Import”), download the Excel file. This file has the following structure:
- Up to 5 sheets:
- Download-Table: Here are the fields chosen for all selected products.
- The first 6 fields are added by the Edit Portal and serve to identify the products (important for later import):
- ID: the unique key field (or ID) of the product.
- Action: defines the action to be applied to the product:
- U ("Update") : if something was changed on the product.
- D ("Delete") : if the product should be deleted.
- N ("New") : if the product should be created.
- Label: the product’s name/designation.
- ClassID: the classes assigned to the product, thus its fields/attributes.
- ParentID: the parent product in a tree-structured assortment.
- StateID: the product’s workflow status.
- The first 6 fields are added by the Edit Portal and serve to identify the products (important for later import):
- Subtables: If in the data model fields of type “Subtable” (complex attributes as a table) were selected, the rows of these tables appear in the “Subtables” sheet.
- References: Contains references between products, e.g. predecessor/successor product or accessory/main product.
- Selections: Contains workflow statuses and value-list entries.
- Meta: System-internal sheet storing information about the data model including editable fields.
- The "excel_meta_encrypted" parameter determines whether this sheet’s content is encrypted.
- It is recommended to store these system infos encrypted, because careless modification would prevent import.
- The "excel_meta_encrypted" parameter determines whether this sheet’s content is encrypted.
- Download-Table: Here are the fields chosen for all selected products.
NOTE: Always remember to set a value (U / D / N) in the “Action” column if you want to make a change. This also applies to deleting products, which must be marked with “D” (removing a row without setting “D” has no effect on subsequent import!).
 \Image 48: Excel file structure: sheets
 \Image 49: Excel file structure: control fields in the “Download-Tabelle” sheet to identify products
- Similar to the control fields in the main “Download-Table” sheet, the Subtables sheet also contains 4 control fields:
- Main product: Reference to the “ID” column in the Download-Table (starting point of the subtable).
- Main field: Corresponds to the (complex table) attribute to which the row refers.
- Action: Defines the action for the subtable row:
- U ("Update") : if the row was modified.
- D ("Delete") : if the row should be deleted.
- N ("New") : if the row should be created.
- ItemTableID: The ID of the row. This field should not be changed.
 \Image 50: Excel file structure: control fields in the “Subtables” sheet to identify subtable rows related to products
- In the References sheet, there are also control fields:
- Main product: Reference to the “ID” column in the Download-Tabelle (starting point of the reference).
- Main field: Corresponds to the reference attribute to which the row refers.
- Action: Defines the action for the reference:
- D ("Delete") : if the reference should be deleted.
- N ("New") : if the reference should be created.
The following columns define the endpoint of the reference. You can always use the ID of the target product. If you don’t know the ID, you can use other unique fields to identify the product:
- ID: The target product’s ID. If known, fill only this field.
- Label: If you know the exact name/designation of the referenced product, enter it here.
- SAP-Nr: Example of another field that may have been configured;
- SAP number is usually unique and works well in SAP-using companies.
NOTE on reference identification logic:
- The start point is always the ID in “Main product” for the reference attribute in “Main field”.
- The endpoint is determined from one of the fields after the “Action” column:
- The system checks left to right if exactly one product matches the given attribute value.
- If it matches for the first attribute (e.g. “ID”), the reference is established; otherwise it checks the second attribute (e.g. “Label”), etc.
- Fields can remain blank if multiple references are to be created:
- For instance, creating 3 references:
- 2 references from product with ID=4061 (listed in main sheet):
- to product with SAP-Nr 1003921
- to product with SAP-Nr 1001531
- 1 reference from product with ID=4062 (in main sheet):
- to product with SAP-Nr 1001656
- 2 references from product with ID=4061 (listed in main sheet):
- For instance, creating 3 references:
- The system checks left to right if exactly one product matches the given attribute value.
 \Image 51: Excel file structure: control fields in the “References” sheet to identify references between products
- In the Selections sheet are stored workflow statuses and value-list entries.
- This sheet MUST NOT be modified. It is not possible to create new value-list entries here.
- The data serve primarily to verify correctness of values entered in the “Download-Tabelle”.
- It also helps when editing fields: ensure you choose exactly the spelling from this list when editing a value-list field (identified by “field_key”).
 \Image 52: Excel file structure: “Selections” sheet containing workflow statuses and value-list entries
- The Meta sheet contains important information about the data model. These values should not be changed.
- Ideally set the parameter "excel_meta_encrypted" to 1/true when creating the Edit Portal.
- In the example below, it is set to 0/false, so you can see the data-model info.
- Of interest is the “usage” field, indicating if a field is editable (contains “EDIT”) or not.
NOTE: If you modify a field marked as “Non-Editable”, your changes will be ignored on import. Be sure to mark the correct fields as editable.
 \Image 53: Excel file structure: “Meta” sheet containing info about the data model
Importing data
Once you have made the desired changes in the Excel file, you can apply them into the Edit Portal.
- To do this, open the User Menu and choose “Excel import”.
 \Image 54: Importing Excel file via the User Menu
Please note that the import considers only changes marked in the “Action” column as U=Update, N=New, or D=Delete.
- After import, the changes you made are displayed in an overview.
- For U=Update, you can click the (update) button to display the specific changes.
 \Image 55: Displaying changes from the Excel list and filtering option (top right)
- If changes affect a complex table attribute (Subtable), you can display them via another button.
 \Image 56: Displaying changes of a “Subtable” field
- Use the checkbox on the left to select which changes you want to apply (marked as (1)); changes not to be applied appear unchecked (marked as (2)).
- When you agree with your selection, click the “Save” button.
 \Image 57: Selecting changes to apply and clicking “Save”
Finding the ParentID
For import including building a tree structure, the ParentID (ID of the parent product) is required. In the portal, you can determine the ParentID of a given level as follows:
- Switch the left column view in the portal from “Filter” to “Tree”.
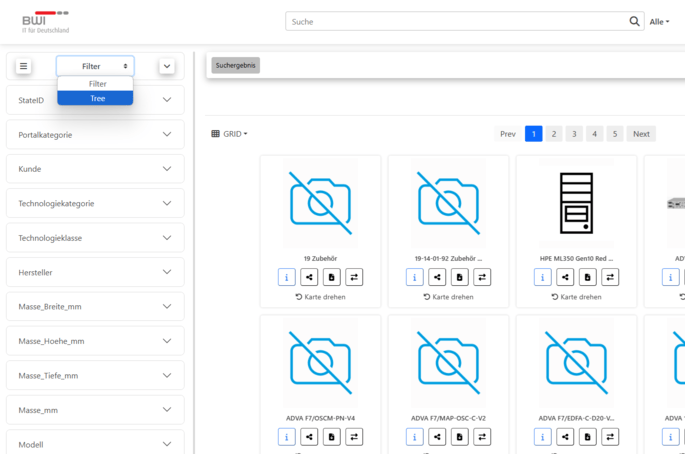 \Image 58: Choosing between facets or tree structure
- Once the tree is loaded, you see the hierarchy, where the first element “Search Result” is the top level in the portal.
- By clicking the arrow icon next to the folders, you can expand levels and navigate the tree.
- If you hover over an element in the tree, a mouseover tooltip appears with info (ID + Label of the product):
- ID: the number before the dash is the product’s ID. This ID is used as ParentID if a new product is to be created under this branch.
- Label: the text after the dash is the product’s label.
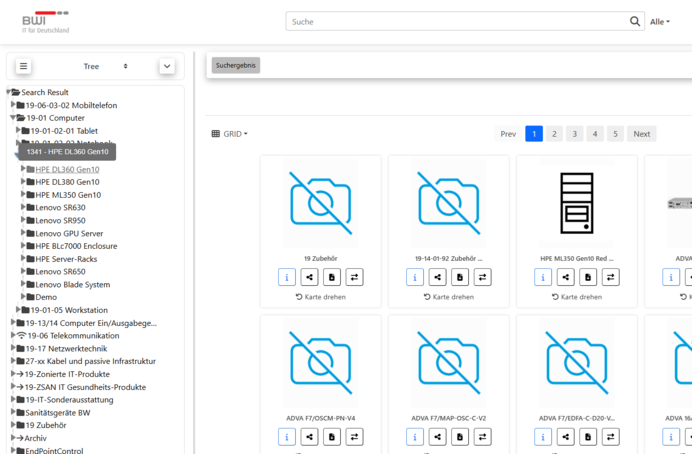 \Image 59: Mouseover on an element showing its ID and Label