Structure and configuration
Structure of the Portal Station
The structure of the ADIB Portal Station is as follows:
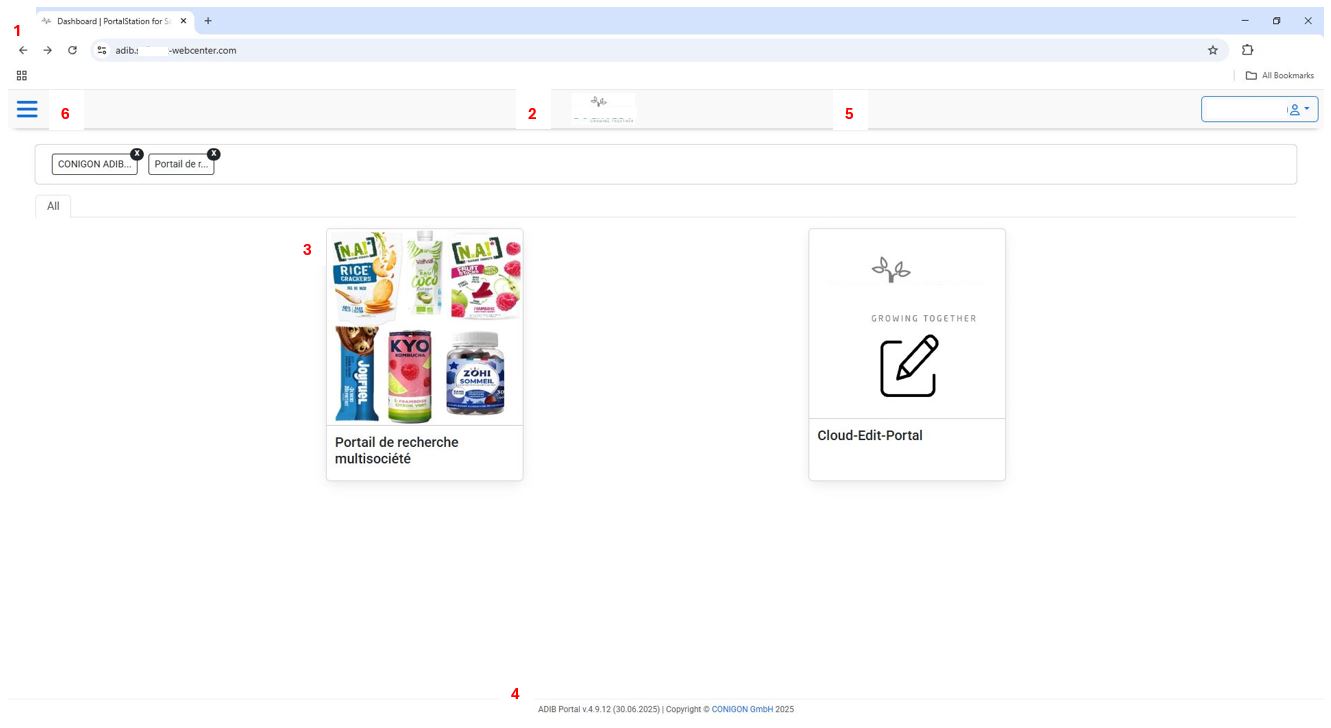
- (1): User menu of the Portal Station
- (2): Direct jump to the portals – useful especially if you are already inside a portal and want to switch
- (3): Recently visited portals
- (4): Categories of the Portal Station
- These result from the configuration in the Portal Manager (see below) – as do the following elements
- (5): Image ("Widget image") of the portal in question
- (7): Title ("Widget heading") of the portal in question
- (8): Short description ("Widget Text") of the portal in question
 PICTURE: Elements of the Portal Station
By clicking on one of the portal images, you switch to the corresponding portal. The view then changes as shown in the following figure:
- (1): Name of the selected portal and logo of the Portal Station
- By clicking here you can return to the Portal Station
- (2): Direct jump to the (other) portals
- This is the direct way to switch to another portal without going through the Portal Station homepage
- (3): Logo of the selected portal
- PLEASE NOTE: This is independent of the portal image ("Widget image") that is defined for the portal within the Portal Station!
 PICTURE: Selected portal within the Portal Station
The Portal Station can be configured flexibly and easily. The options for this are stored in the ADIB Central Station.
IMPORTANT NOTE: The Portal Station is a web application independent of the other ADIB components (Central Station and Integration Client). However, it regularly synchronizes with the configurations made in the Central Station. You can also explicitly trigger this synchronization in the Portal Station.
Login to the Portal Station
Access to the Portal Station is via entering the corresponding URL in a browser.If portals are marked as "open" (this simply means that no user group has been explicitly assigned to the respective portal), the user is redirected to the portal start page, where they see all open portals.
 PICTURE: Non-logged-in user sees only the open portals
The user can also log in explicitly via the user menu --> Login.
- Here the user enters their username and password.
NOTE: The image on the login window as well as the text can be adjusted via configuration settings.
 PICTURE: After user login, all portals defined for the user group become accessible
After successful login, the user sees – in addition to the open, publicly accessible portals – those portals that have been assigned to their user group.
ADIB Portal Manager
The ADIB Portal Manager provides a centralized environment to manage, configure, and navigate across all available portals within their instance. It serves as a customizable interface, enabling clients to tailor the branding, structure, and login experience for their users. From updating logos and layout dimensions to configuring login authentication methods, the Portal Manager provides complete cosmetic and functional control over the portal presentation. Requirements for Portal Customization To ensure proper configuration and visibility of changes within the Portal Manager:
- Access to Portal Manager > Portals must be enabled.
- The current portal instance must be properly connected to Central Station.
- A valid session must be active to save or sync updated settings.
Note: Configuration changes only take effect after syncing updates using the Update Data option in the user dropdown.
Navigating the Portal Manager
Step 1: Access Portal Settings
- Log in to Central Station.
- Navigate to: Portal Manager → Portals
- Click the "Portal Settings" button located in the top-left corner.
This opens the Portal Station Settings panel where cosmetic and structural options can be configured.
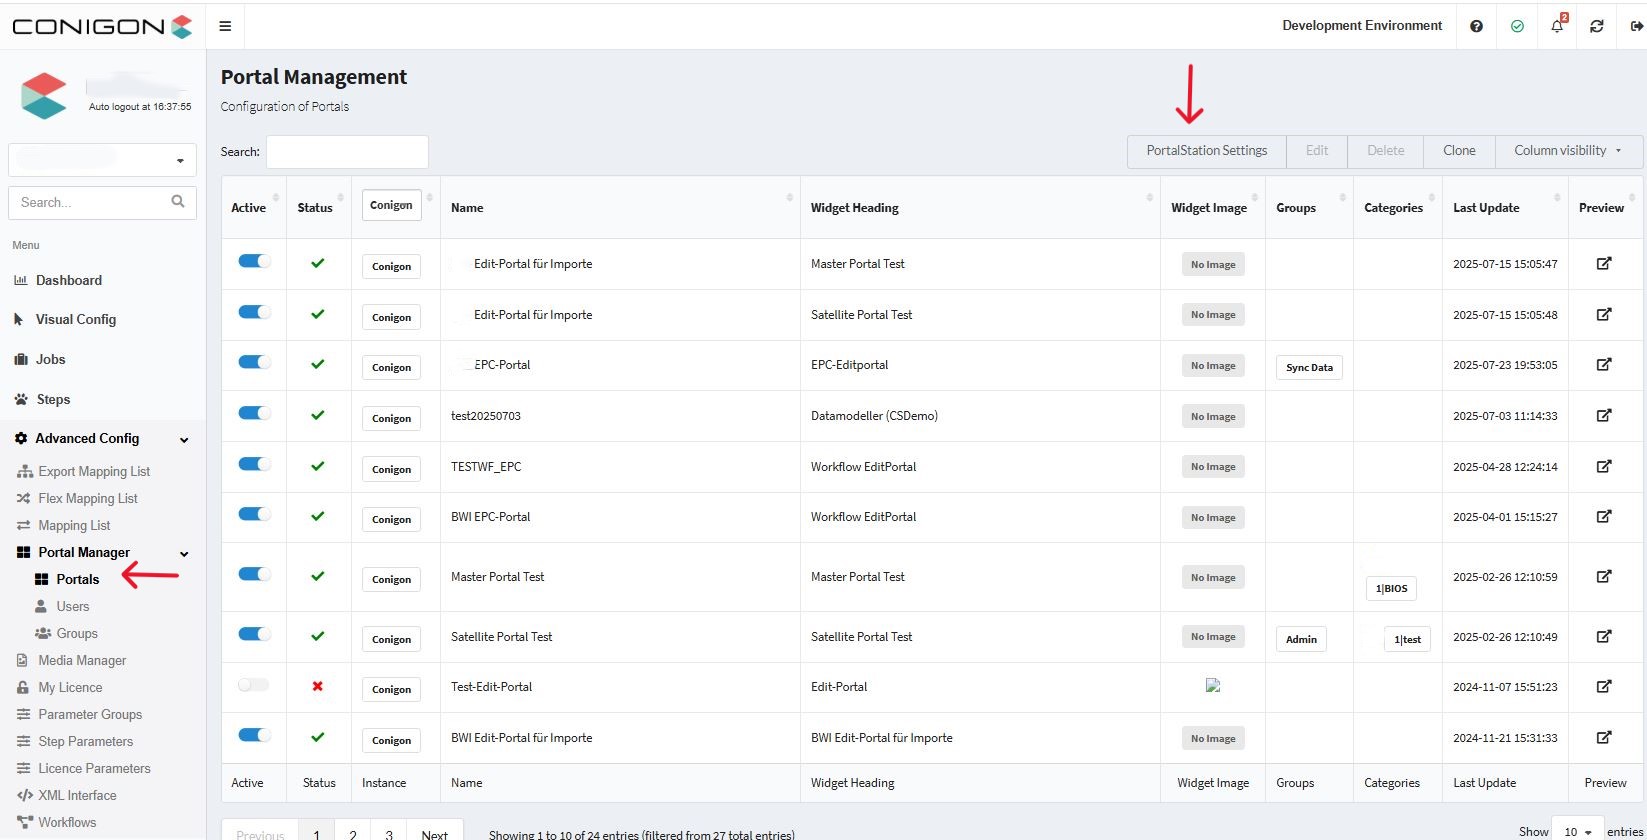
PortalStation Configuration Options
Once you have opened the PortalStation settings, a configuration window appears with various customization options. Here, you can modify the look and feel of the PortalStation homepage, including its layout, links, and tabs to match your branding needs. Additionally, you can configure the login screen to customize elements such as the welcome message, background image, and authentication settings.
Syncing Portal Configurations from ADIB to PortalStation
- Open the ADIB application and navigate to the Portals section.
- Choose your configuration options for the portal as needed (e.g., homepage layout, tabs, links, and login settings). See below for full explanation of configuration options.
- Once your configuration is complete in the Portal Manager in Central Station, press save, and then go to PortalStation.
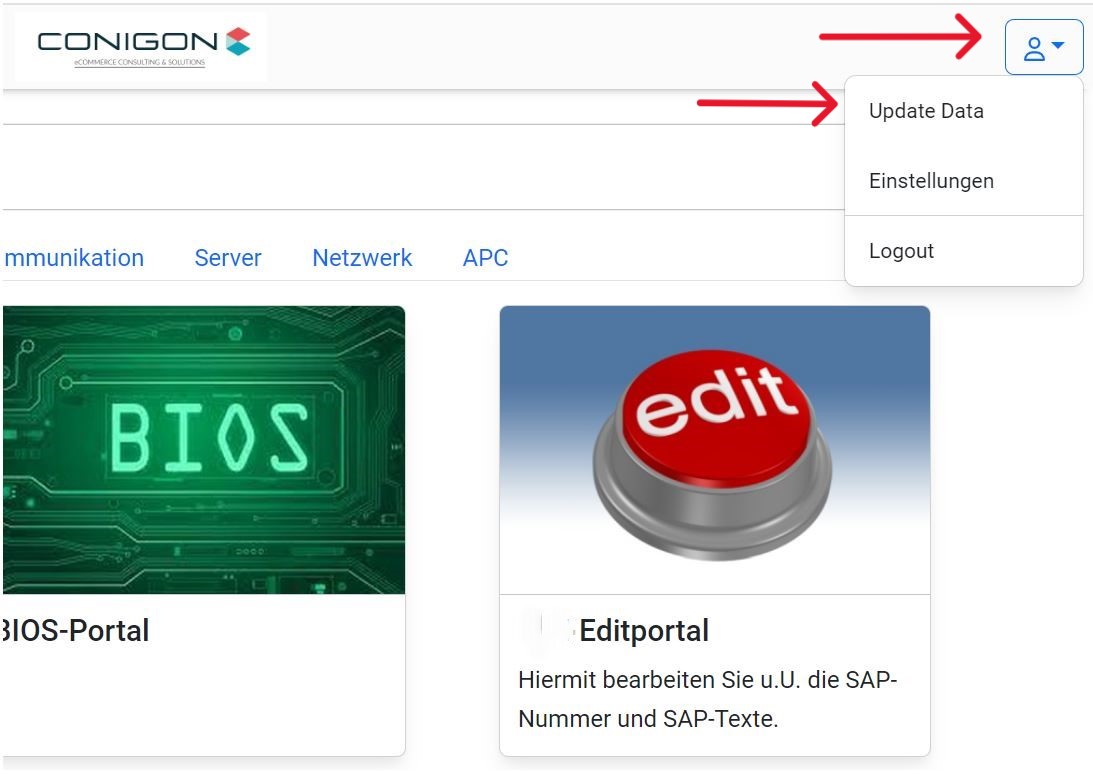
- In the top right corner of the PortalStation window (next to your username), click the dropdown button.
- From the dropdown menu, select "Update Data" to sync the latest configuration changes.
Note: Changes will only be applied after both PortalStation and the Portal Manager in Central Station have been successfully synced. Make sure to update data in both systems to reflect your latest configurations.
PortalStation Configuration Settings
Below is a screenshot of the PortalStation settings window. Continue reading for an explanation of the possible PortalStation settings. A figure linking each setting to its effect on the PortalStation appears at the end of this section.
Homepage Configuration
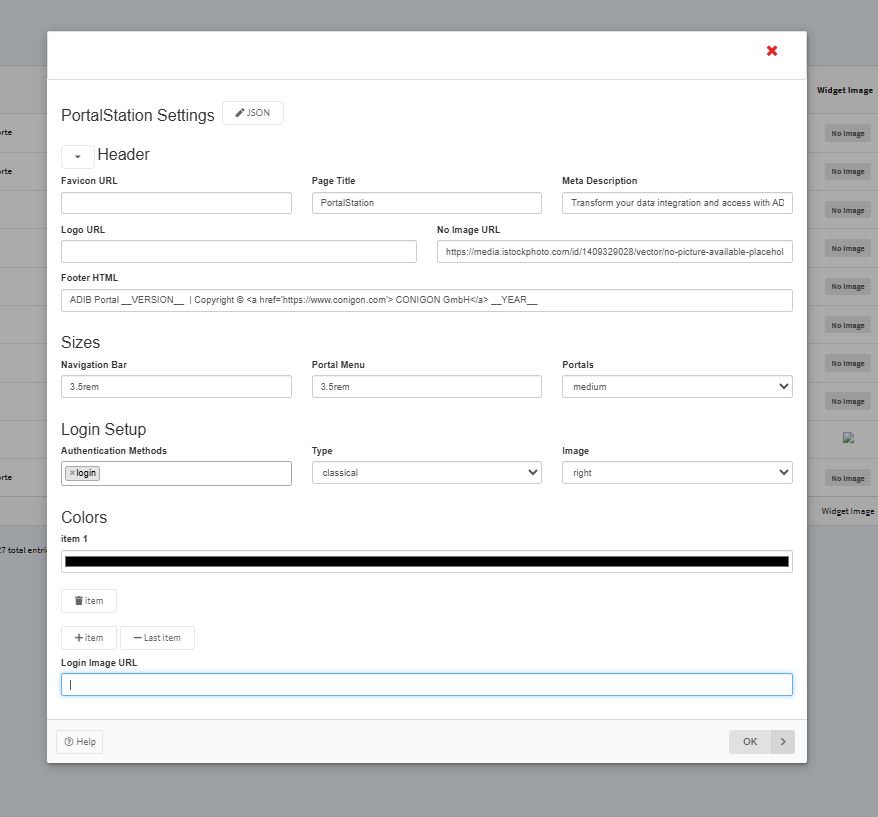
Header Section
- Favicon URL: Enter the URL of the small icon that appears in the browser tab (commonly a company logo). See image below figure 1.
- Page Title: Page title can be configured in this field. The page title is the title text displayed on the browser tab. See image below figure 1.
- Meta Description: A short description that appears when the portal link is shared (e.g., in messaging apps or social media).This meta description improve link previews.
- Logo URL: The main logo displayed at the top of the portal interface. This must be a valid image URL. See image below figure 2.
- No Image URL: A fallback image that appears on portal tiles if no individual image has been provided for the portal tiles on the PortalStation homepage. See image below figure 3. Individual images for each portal can be configured in the PortalStation main page.
- Footer HTML: Custom HTML to define the footer displayed on Portals and the Portal Station. See image below figure 4.
- Example : ADIB Portal __VERSION__ | Copyright © \<a href='https://www.conigon.com'> CONIGON GmbH\</a> __YEAR__
- You can use dynamic placeholders:
- __VERSION__ Automatically replaced with the portal version.
- __YEAR__ Automatically replaced with the current year. If left empty, no footer will be shown.
Sizes Section – Layout Configuration
- Navigation Bar Size: Sets the height of the top navigation bar. Default: 3.5 cm. See figure 5 below.
- Portal Menu Size: Controls the width of the sidebar menu, which is accessed via the dropdown in the top-left corner. Default: 3.5 cm. See Figure 6 below.
- Portal Tile Sizes: Defines the size of the portal tiles shown on the dashboard. Tile in figure 3 is set to medium.
- Options: Small, Medium, Large, or Extra-Large.
Login Configuration
Login Setup Configuration – Authentication Methods
- Local Login : Allows users to log in using accounts created in Central Station > User Management.
- Keycloak : Enables third-party authentication (e.g., Google, Facebook, or corporate Single Sign-On). Requires setup by a consultant, including API key configuration on the Portal Station container, however can be disabled and enabled via this setting.
- Disable Login : Disables all login access to the portal. Read only view of portals will be displayed Warning: If you disable login and then click "Update Data", and then log out you will be locked out of the portal until login is re-enabled by an ADIB consultant.
Login Page Type
- Classic Login: Login form appears on the right side of the screen, with an optional image displayed on the left. (See first image below).
- Centered Login: Login form is centered on the screen, with a full-screen background image. (See second image below).
Login Image URL
- Enter a valid image URL to be used on the login screen.
- Image placement depends on the selected login layout:
- Left-side image for Classic Login
- Full-screen background for Centered Login