Workflows
Workflows
A workflow is a defined process that tracks changes in the state of an element in the system. When the element moves from one state to another, an email notification can be sent through the execution of an action to the responsible party, allowing them to approve or reject the new state of the element. Workflow includes 'workflow states' and 'workflow actions.'
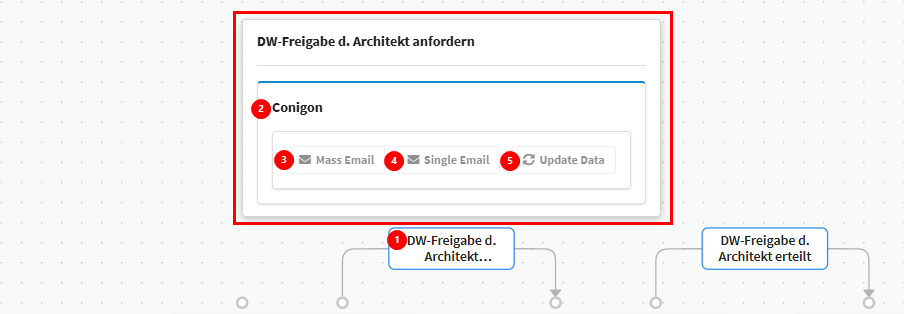
- Workflow Action : it is the action that allows an item to move from one state to another. It allows the user to monitor product updates and users to determine different procedures that products go through during enrichment. As a product moves from one state in the workflow process to another the user can be altered through an action step. These steps either allow for the user to be notified via email when a product is updated via the Single Email or Mass Email process. There are three different types of action :
- Mass Email : gathers multiple products that have changed their status, then sends one email with a mass of updated products to the responsible.
- Single Email : any time a product triggers the workflow a single email with this single triggered product is sent to the responsible.
- Update Data : Can update a given attribute(s) if the configured conditions are met.
- Workflow State: it represents a specific status or condition of an element (such as a product) within a workflow. It indicates where the element is currently in the process and helps to track progress, define responsibilities or trigger subsequent actions.
Editing and Managing Workflows
Accessing the Workflows To create or manage workflows in the ADIB application:
- Navigate to the Advanced Configuration section of the application (see reference 1 in the image).
- Click on Workflow (see reference 2 in the image).
Once you access the Workflow section, a list of all previously configured workflows will be displayed.

Workflow Global Overview
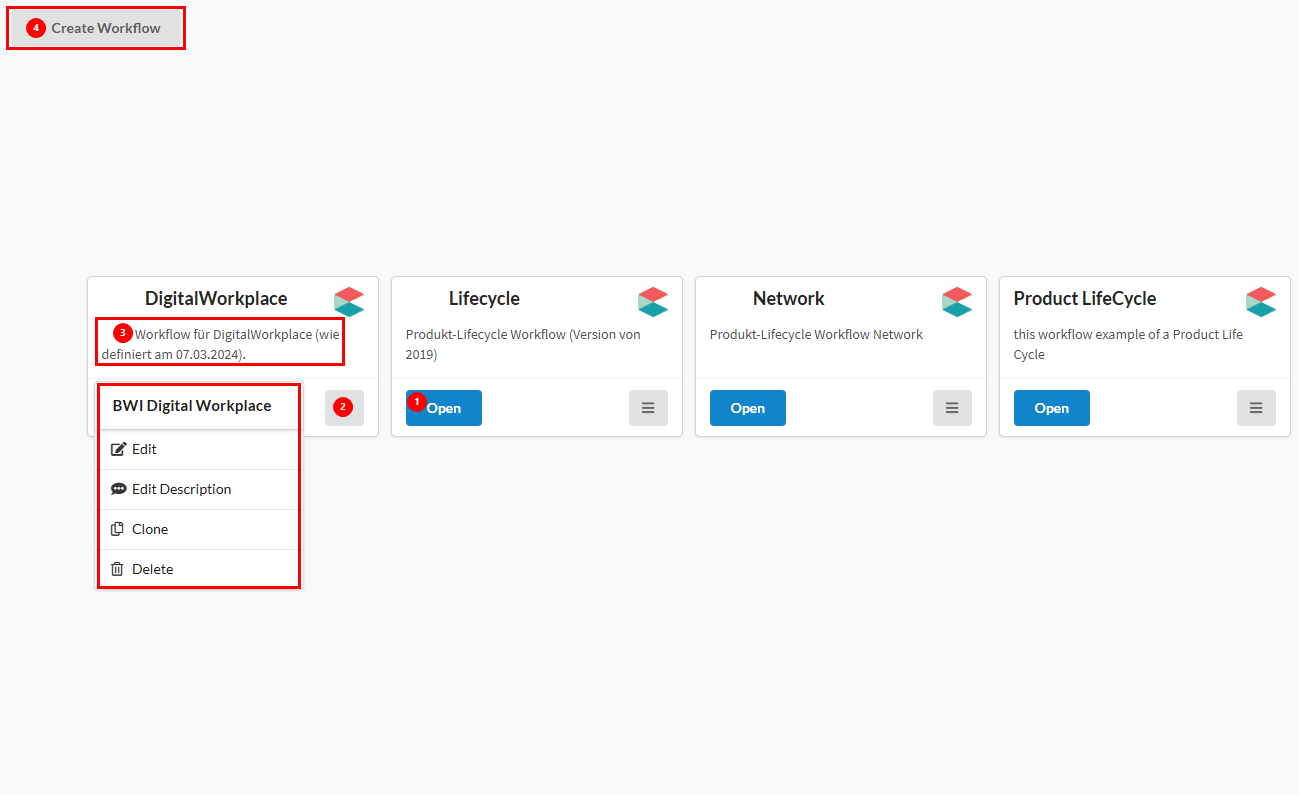
In this window you can create new workflows, edit, clone or delete configured workflows. The following actions are possible from this view.
- To open a workflow press on the blue button titled 'open workflow' (see 1 in reference image)
- You can create a new workflow (see 4 in reference image)
- Each existing workflow includes a hamburger menu (see reference 2 in the image) that provides additional management options. By clicking the hamburger menu, you can:
- Edit the workflow position and name
- Edit the workflow context menu description (see reference 3 in the image)
- Clone the workflow
- Delete the workflow
These options allow administrators to efficiently modify, duplicate, or remove workflows as needed.
Configuring Existing Workflows
As previously stated to enter a workflow simply press open on the existing workflow tile. And you can see the present workflow
Configuring Workflow States
A Workflow State represents a specific status or condition of an element (such as a product) within a workflow. It indicates where the element currently is in the process and helps teams:
- Track progress
- Define responsibilities
- Trigger subsequent actions
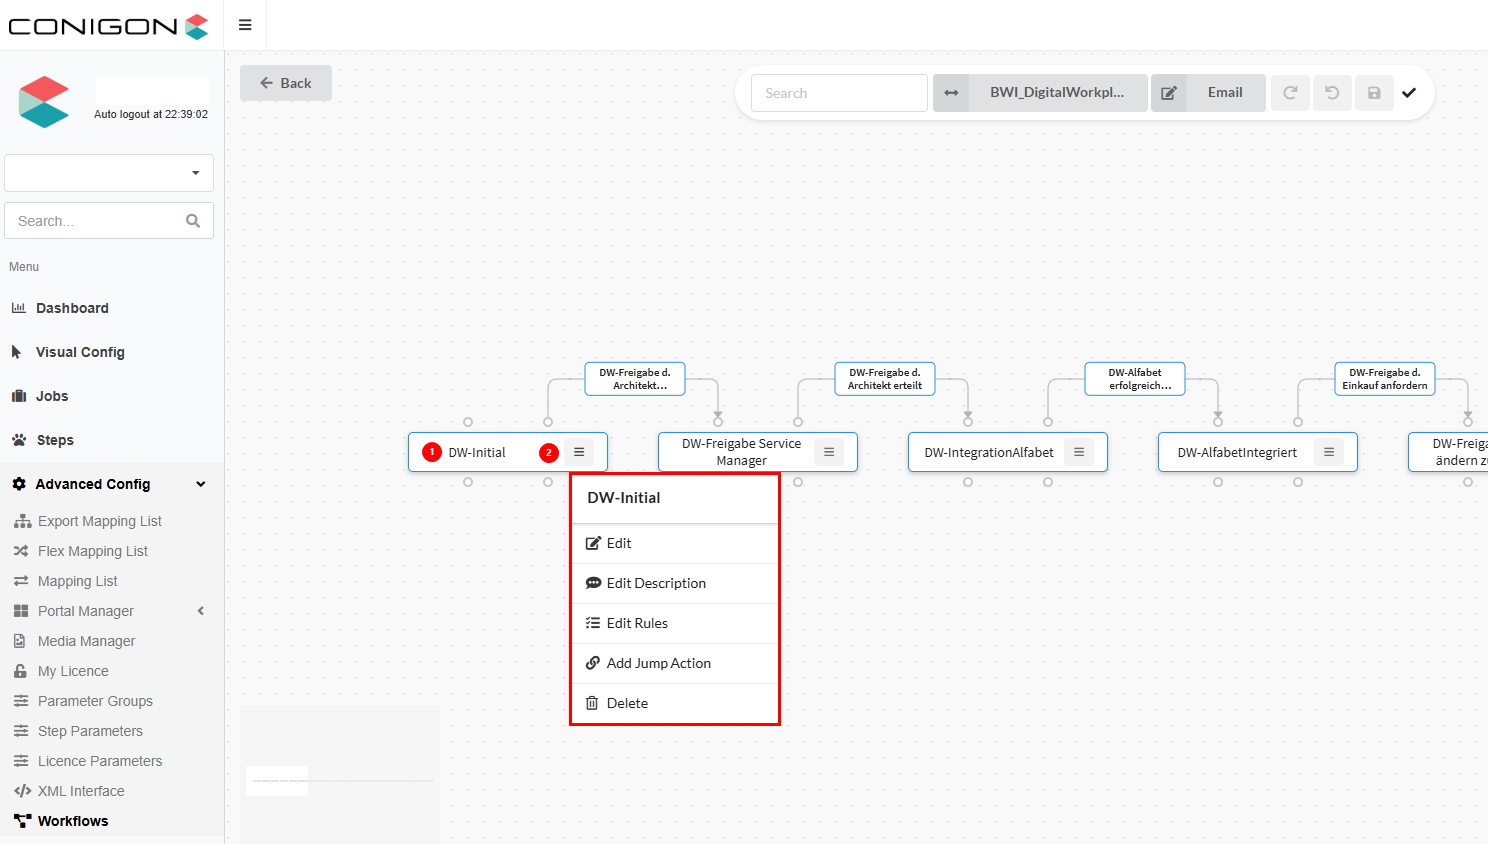
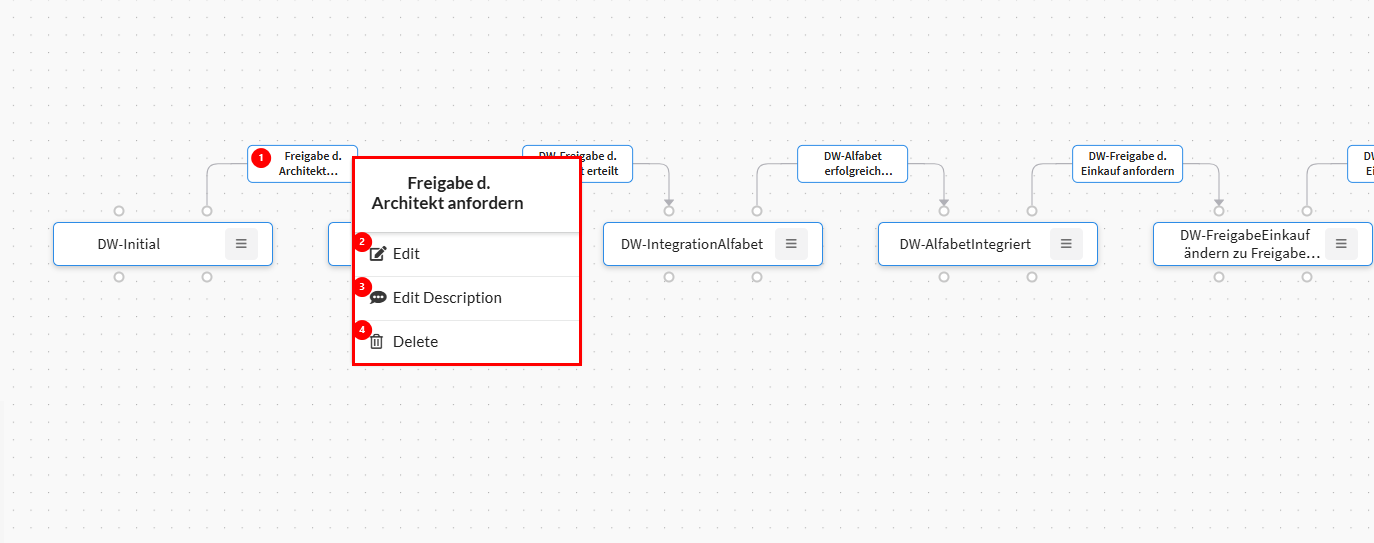
To configure a workflow state:
- In the global workflow view, locate a state (see 1 in reference image below)
- Next to the state, click the hamburger menu (see 2 in reference image below) to see available options:
- Edit State
- Edit State Description
- Edit State Rules
- Add Jump Action
- Delete State
Editing a State
When editing a state, you can modify the following properties:
- State Name – Update the display name of the state
- Technical Name – Automatically generated as workflowname_statename; can be modified here
- Position – Change the order of the state in the workflow
- Outlined Color – Modify the color used to outline the state
Editing the State Description
- Provides a short description displayed under the state name in the workflow view
- Helps users understand the purpose or requirements of the state
Editing the State Rules
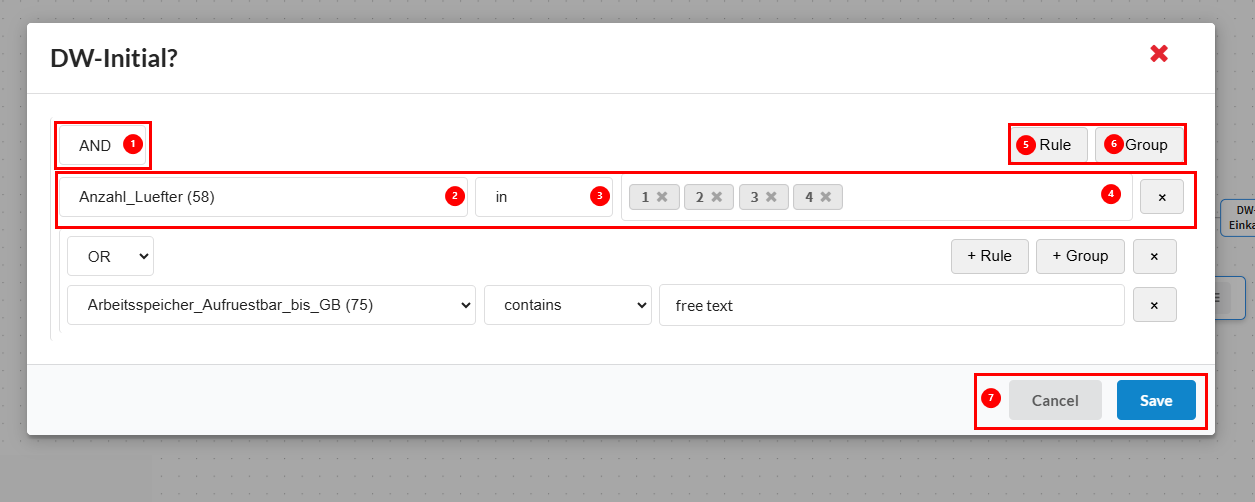
State rules define the conditions that an item must meet to enter a particular state. Administrators can configure these rules with flexibility to match business requirements. Key aspects of editing state rules include:
- Defines conditions for an item to enter this state
-
Supports AND/OR logic, e.g., certain attributes must be filled or meet specific criteria (see reference image below for more details)
-
Logical Operators
- Choose between AND or OR logic to combine multiple conditions :
- AND Determines whether all conditions must be met
- OR any condition can trigger the state
- Choose between AND or OR logic to combine multiple conditions :
- Attributes Selection
- Select the attribute(s) to use for the rule.
- Condition Options : dynamic options will be provided depending the attribute type.
- Value : refers to the necessary value to meet the rule's condition. Value will dynamically change depending on the attribute chosen see reference photo for an example of a free text attribute, and a multi-select option.
- Adding Multiple Rules
- Add additional rules as needed to cover all conditions for the state
- Grouping Rules
- Organize rules into groups to structure complex conditions logically
- Save or Delete Actions
- Press cancel to delete actions, and save to save your configuration.
Jump Actions
Visually marks that the product jumps in another workflow.
- Use Cases
- Ideal for exception handling or situations where certain items require additional processing outside the standard workflow
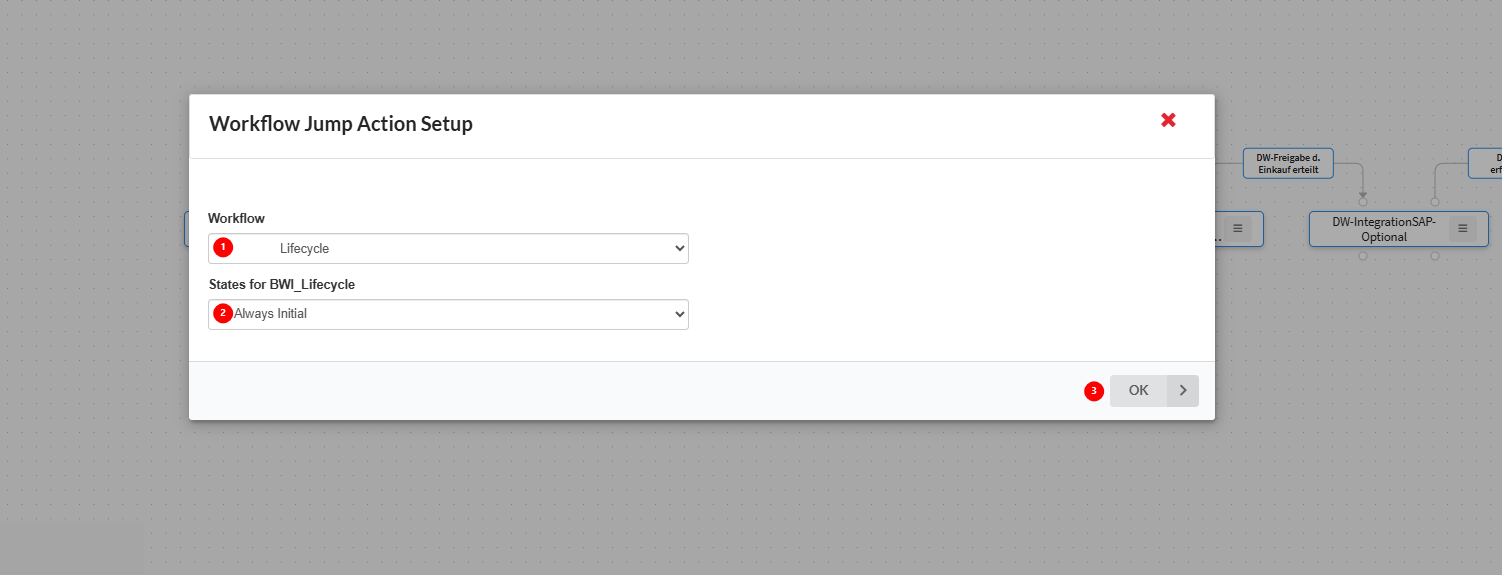
- First select the workflow you would like this product to jump to after requirements are met.
- Select the state you would like this product to jump to.
- Press 'ok' to save your choices.
Workflow Actions
A Workflow Action defines the action that allows an item to move from one state to another. It enables users to:
- Monitor product updates
- Determine the procedures products follow during enrichment.
When a product moves from one state to another, the responsible user can be notified through an action step. Action steps include:
- Mass Email
- Gathers multiple products that have changed their status
- Sends one email listing all updated products to the responsible user(s)
- Single Email
- Sends a single email for each product that triggers the workflow
- Ensures that each product update is communicated individually
- Update Data : as seen in reference image first configure the conditions that must be met, and then choose the change that you would like to be updated, when the action is running.
- Automation : as seen in reference image when conditions are met this action will be run automatically.
Editing and Viewing of Workflow Actions
Viewing Workflow actions
- Clicking on a workflow action brings up a pop up window to see workflow action information.
- Instance where this action is preformed.
- If mass email is selected for this action.
- If single email is selected for this action.
- If update data is set for this action.
Editing Workflow Actions
- Right click on Workflow Action to call the workflow action pop-up.
- You can edit the workflow action
- Edit the context description which can be displayed below the workflow action name
- Delete the workflow action.
Editing Workflow Actions
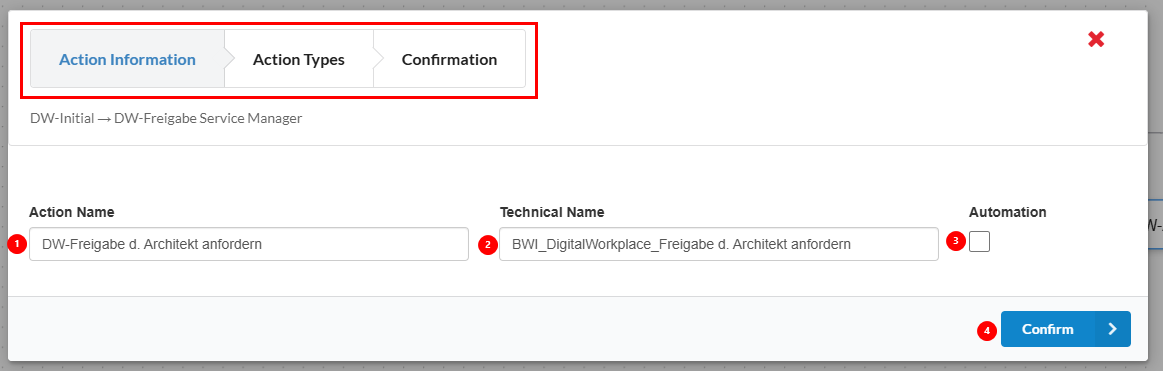
After clicking on edit workflow action (see 2 in image above). An editor window will open where you can edit the action information, action type and confirm your changes.
In the Action information you have access to the following actions :
- Changing the action name.
- Editing the action technical name.
- Adding automation to this action.
- Press okay to confirm your changes and move on to action type.
In the Action Types you have access to the following configurations :
- Selecting the instances you wish this action to be performed on.
- Selecting the action type you wish to be performed : Mass Email, Single Email and Update Data.

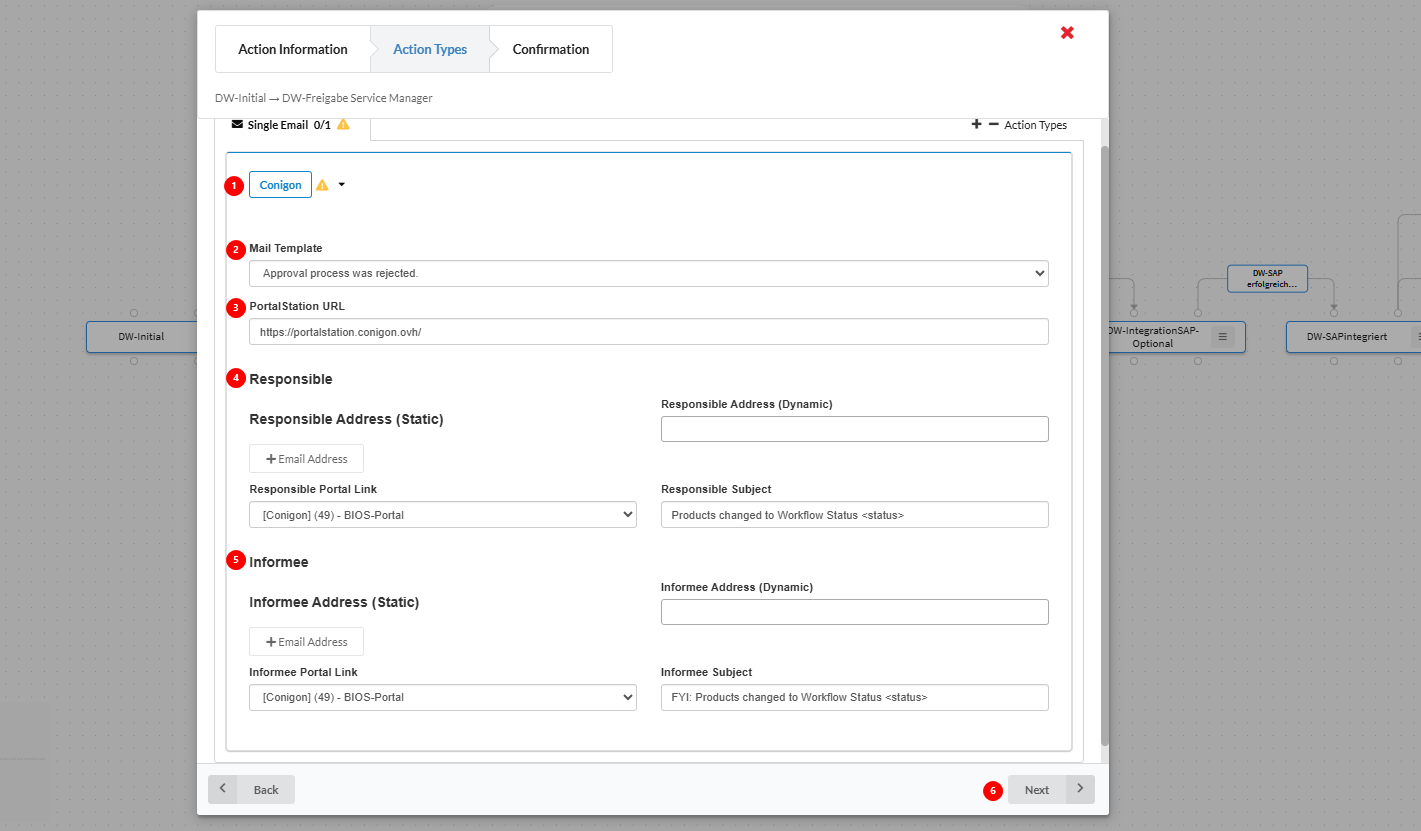
Once you have selected the type of action you would like to prefer via the toggle button a screen will appear with configurations of the different action types.
Here we see three main sections of the action type for mass email (see table for detailed information about each field of below configuration):
- Instance: Specifies the instance in which this action is executed.
- Email Template: Defines the predefined email template that will be used for this action type.
- Portal Station URL: Specifies the URL of the Portal Station that will be associated with this workflow.
- Responsible: Defines the notification configuration for the designated responsible user. See the table below for a detailed overview of the available configuration options.
- Informee: Defines the notification configuration for the designated informee. See the table below for a detailed overview of the available configuration options.
- Finally save your choices and move to the next section where you can confirm your choices.
Parameters of Action Types
| Parameter | Description |
|---|---|
| Email Template | Choose your desired email template. From this window, you can only choose from the existing templates. To create a new email template, refer to the documentation section “Email Template Configuration.” |
| Portal Station URL | Define the URL of the portal station that will be used for this workflow. |
| Portal URL Function | Search Attribute Function - defines the attributes where the email addresses must be filtered. Search Affected Objects - This defines if it must be filtered with only the product ids that are concerned in the action. |
| Search Attributes | Search attributes can be defined here. |
| Responsible | Refers to the person in charge of approving the product's state and who has access to edit content and make changes to product data. |
| Responsible Subject | Enter the subject you would like this email to have for the responsible person. |
| Responsible Portal Link | The portal link that will be sent to the responsible in the workflow email. |
| Responsible Address Dynamic | For data models with attributes containing email values. This dynamic email address option allows the user to take these addresses from an attribute in the data model. |
| Responsible Address Static | Allows the user to manually enter one or more email addresses for the responsible person. This is a free-text input field. |
| Informee | The informee is another person who can be emailed of this product's update. |
| Informee Subject | Enter the subject you would like this email to have for the informee. |
| Informee Portal Link | The portal link that will be sent to the informee in the workflow email. |
| Informee Address Static | For data models with attributes containing email values. This dynamic email address option allows the user to take these addresses from an attribute in the data model. |
| Informee Address Dynamic | Allows the user to manually enter one or more email addresses for the informee. This is a free-text input field. |
Creating and Managing Email Templates
Email templates are a powerful tool for automating notifications within workflow actions. They allow users to receive messages whenever specific events occur in the workflow, such as an item moving from one state to another. These templates can be linked directly to action types in the workflow, such as Single Email or Mass Email, ensuring that notifications are sent automatically based on the workflow configuration.
The Email Template options are located at the top of the workflow screen. From this section, users can:
- Scroll through previously configured templates
- Add a new template
- Edit a template to update its name, content, fields, or placeholders
- Delete a template that is no longer needed
See image and details below for information on adding, editing and managing email templates.

Creating a New Email Template
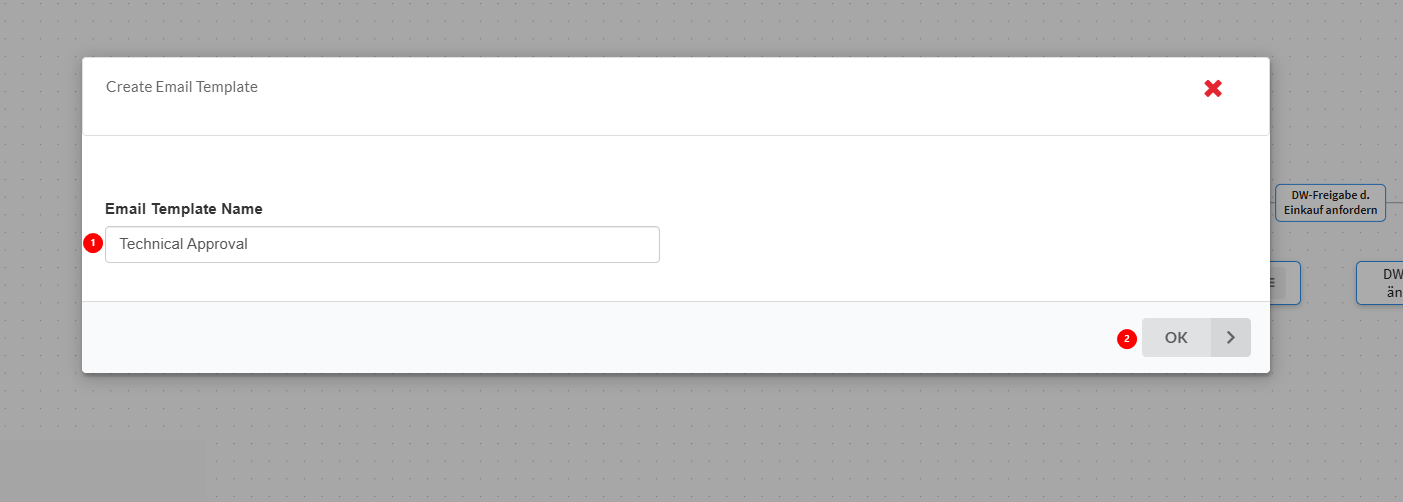
- In the Email Templates section of the workflow configuration, click Add Template (see 2 in reference image above).
- A pop-up window will appear to begin the creation process.
- Enter the Name of the new email template:
- Choose a clear, descriptive name that reflects the purpose of the template, such as Product Update Notification or Workflow State Change Alert.
- Click Save to confirm the template name and proceed to the configuration screen, where you can:
- Compose the email message
- Insert dynamic fields and placeholders
- Format the content using standard text tools
Saving the template at this stage ensures that the name is recorded and the template is ready for further configuration.
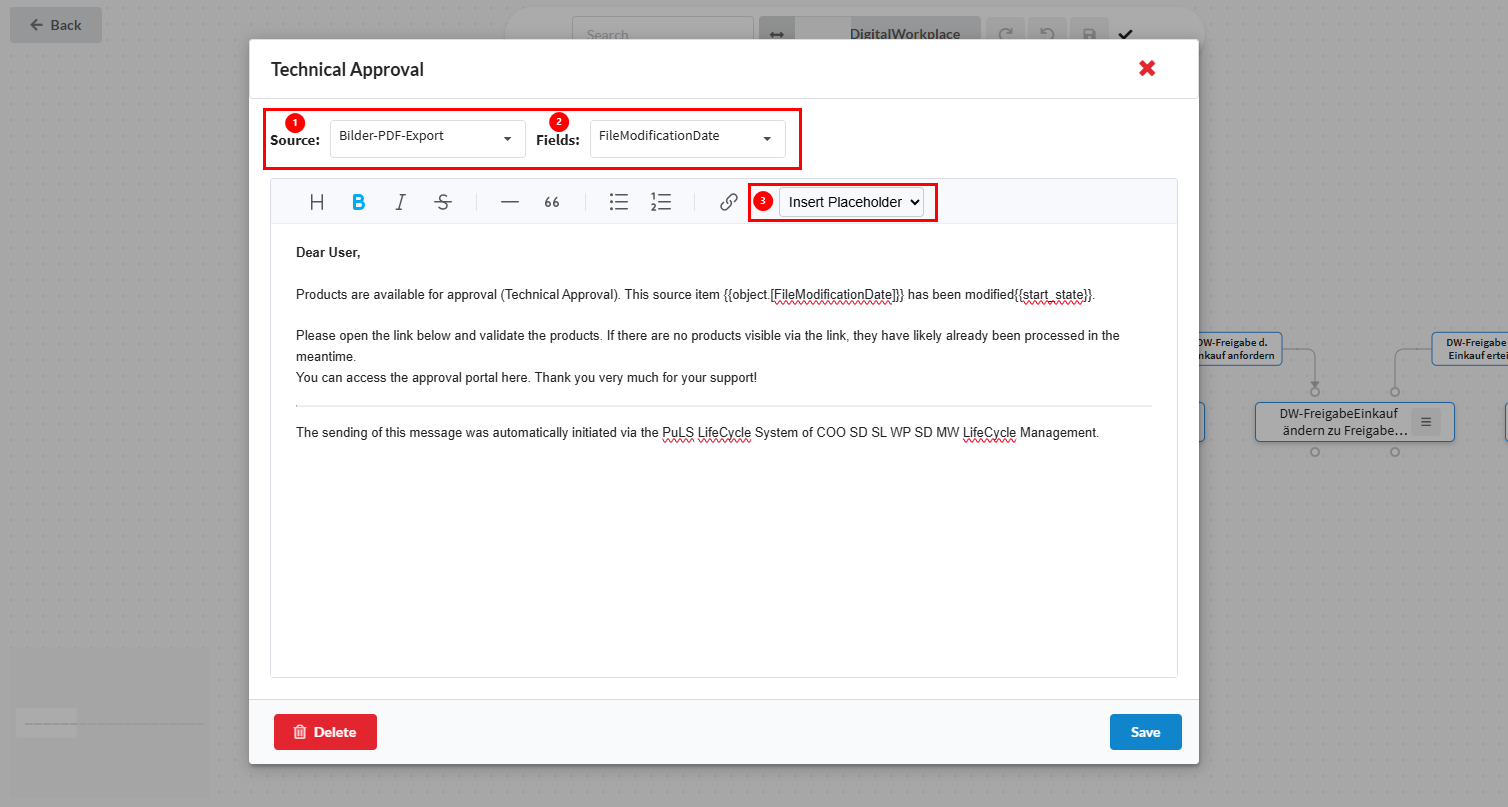
Template Configuration
- Source: Refers to the attribute that has been modified during the workflow.
- Field: the attribute that has been chosen.
- Available placeholders that can be inserted into the message include:
- Portal URL – the link to the portal in which the modified products can be seen.
- Recipient Name – the user receiving the notification.
- Start State – the workflow state the item is moving from
- End State – the workflow state the item is moving to
By combining fields and placeholders, each email is automatically customized with the relevant data and workflow context.