Jobs and steps
ADIB-Jobs
In the context of ADIB, a "job" is a "bracket" around several application integration tasks that belong together in terms of content. Each individual task in turn represents a "step", which is explained in the next section.
In ADIB, a "job" is an aggregation of application integration tasks named "steps". Each step is logically built and ordered in a job to make a cohesive series of tasks that can accomplish many kinds of actions. From creating a portal, to populating it at regular intervals or sending data from your ERP to your PIM, from your PIM to your website; most of your data transfers can be setup with ADIB-Jobs and can as easily be monitored in one place!
The issue of execution time is important for the job. Here you define when (and thus how often) the job is to be executed. So you can eg. run a job every day at 1:00 am In an "ADIB-Job" you define:
- If the job is active
- On which instances the job should be executed
- At which position the should job be executed, compared to the other jobs
- The name of the job
- A description*
- Which job should be carried out directly afterwards - which allows you to run several jobs in a row without running the risk of one not being finished when the next is supposed to start
- The time(s) when the job should run
- Here you use the established "cron format"
- Example: "0 3 - - - 1-5" : runs the job every workday (1=Monday, 5=Friday) at 3:00 am
The following figure shows an example of a system's jobs

ADIB-Steps
Steps are the core elements of ADIB's configuration.
A step represents an application integration task. It is usually defined by a source system and a target system as well as a mapping rule that states how the data from the source is to be transported to the target.
A step can also contain other elements:
- Succession process - e.g., send an email upon successful completion of the step
- Predecessor process - e.g., retrieve files from a remote directory (FTP, SFTP,etc.)
- Web service component - i.e., retrieving data from a web service OR transferring data to a web service
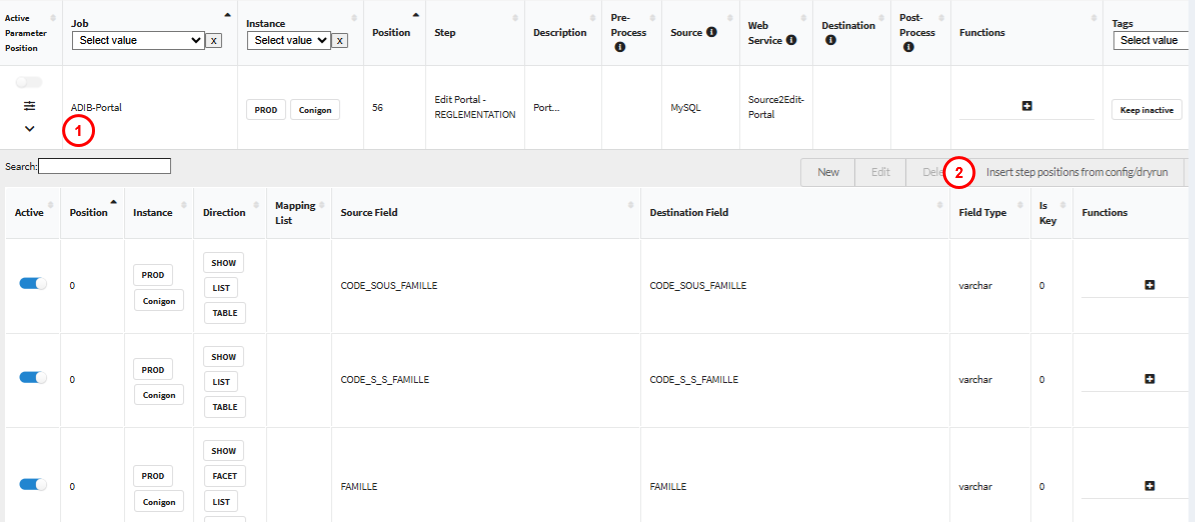
The following figure shows the overview of the steps - filtered for the "Import2ADIB" job

The columns of the displayed table have the following meaning:
- Active / Parameter / Position: Use this to activate the steps or access various configuration steps
- Active: Status of the step - you can easily deactivate a step without deleting it
- Parameters: This opens a "wizard" in which the parameters of the step can be defined - e.g. connection parameters, etc.
- Position: This opens a drop-down list in which the fields for source and destination can be defined. These fields -or positions- are the attributes that will be exported and transformed during the step.
- Job: Defines to which job the step belongs
- Instance: Defines on which instances the step is executed
- Position: Defines the processing order of the steps within a job
- Step: The name of the step
- Description: A description of the step
- preProcess: Defines the pre-process (see below)
- srcModule: Defines the source module (see below)
- wsModule: Defines the web service module (see below)
- destModule: Defines the target module (see below)
- postProcess: Defines the post process (see below)
- Functions: Opens a window in which further details about the step can be defined
The detail window for each step contains the following setting options:

- dryRun: starts a process that checks the connections of the defined modules - and then e.g. reads and returns the possible fields of a defined database table
- stepmodus: defines whether all values are to be transferred (fullTransfer) - or only data that has changed compared to the last data transfer (deltaWholeLine) - or the data lines that no longer exist (deltaDroppedLine)
- setLastExecutionTime: with this you control the date of the last execution. This is interesting if the step is configured in such a way that it only retrieves changed records - but you want it to retrieve all records from the defined point in time for the next run.
- resetIncremental : resets the comparison buffer if the step mode is not equal to "fullTransfer". As a result, ALL data is retransmitted during the next run. The instance must be defined here.
- connectstepid: defines the follow-up process
- steppositionmodus : if this is set to "all", all (known) fields are transferred - it is not necessary to specify "step-positions" in this case
- flexmapping_list: if the step is not to do "simple field-to-field transfer" - but a complex conversion of data structures (e.g. conversion of an EAV model into a structured table), a flexmapping list that was created ahead has to be selected at this point .
- ws_templateid: defines (in the case of a web service module) the web service template
- Elastic template: defines (in the case of an ADIB portal step) the portal template
Insert Step Position from Config/Dryrun Wizard
Overview
The Insert Step Position from Config/Dryrun Wizard allows users to configure, map, and transform step positions efficiently. It provides a structured and intuitive process for selecting master modules, mapping known fields, and integrating Contentserv attributes with MySQL data sources. All configuration options are located in the Steps section of the application. This feature simplifies data integration between MySQL and Contentserv by offering:
- Automated field mapping
- Field type editing
- Duplicate detection
- Bulk editing and filtering
- Real-time validation and synchronization
Accessing the 'Insert Step Position from Config/Dryrun' Wizard
- Navigate to the Steps section of the application located on the left side bar.
- Select the Step Position you want to configure.
- Press the Down button on the left side of the screen.
- On the right side, click Insert Step Positions from Config/Dry Run to open the Step Configuration Wizard.
Wizard Structure
The wizard consists of three main panes, guiding you through the configuration process:
| Pane | Purpose |
|---|---|
| Initiate Pane | Define source or destination data, select master modules, and simulates dry runs to detect available fields. |
| Browsing Pane | Browse, configure, and map attributes. Includes tools for filtering, editing, and managing field mappings. |
| Overview Pane | Summarize edited lines and mappings. Review and finalize configuration choices before saving. |
Using the Step Configuration Wizard
Initiate Pane
The Initiate Pane is where you define the data sources and destinations for your configuration. It allows you to select master modules, simulate dry runs to detect available fields, and choose containers for data mapping.
How It Works
When the wizard opens, you will be prompted to select a Master Module.
- The system automatically assigns priorities to the known fields of that module.
- If certain known fields cannot be found:
- Check the Container for related fields.
- Run a Dry Run so the Integration Client can scan the actual fields from both the source and destination.
- After the dry run, detected fields become available for selection within the browser pane.
- From the initiation pane you can see the following columns : module, module type, container, table and known fields.
Using CsConfig for Source or Destination
You can use configuration-based mapping to automatically populate known fields.
- Set the master to Use CsConfig for Source or Use CsConfig for Destination.
- Choose the container from which data should be retrieved.
Available options include:
- Contentserv Main Table Attributes
- Contentserv Subtable Attributes
- All Attributes
- Shows the known fields
- Allows you to see the existing positions
- Press on Insert and Map Known Fields to create new mappings.
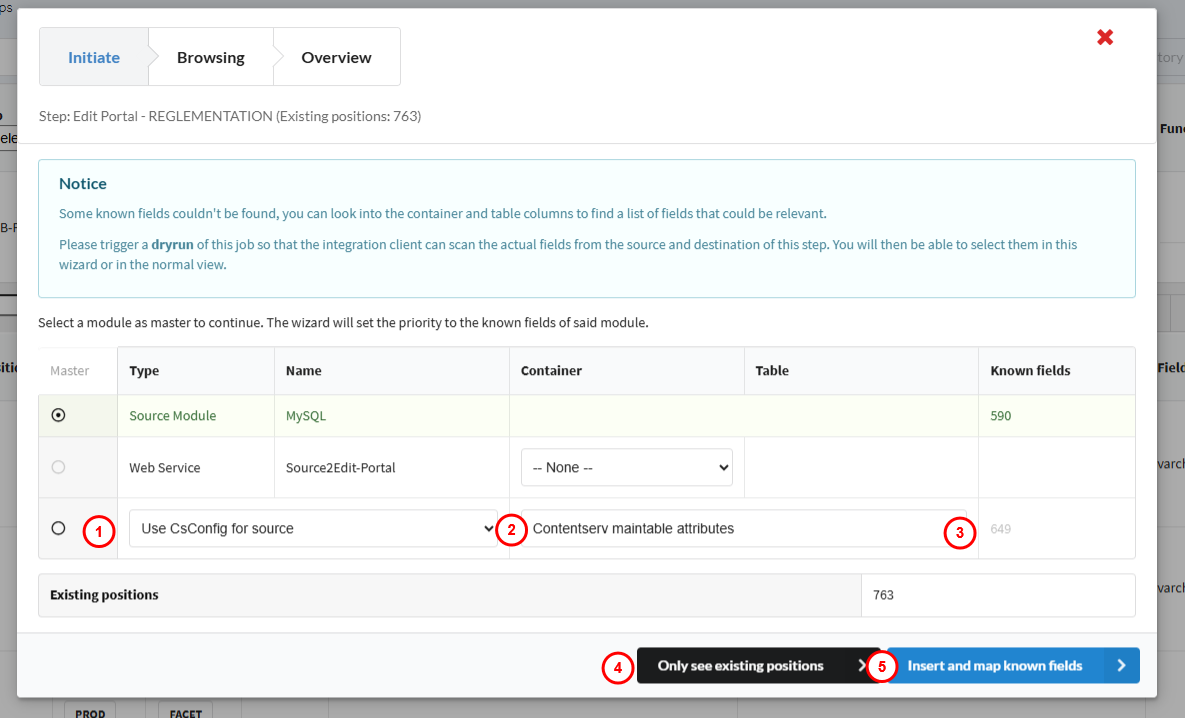
Key Actions
- Source Module: Defines where data originates (usually MySQL).
- Container Options: Determine which container sets can be selected (configured by ADIB consultants).
- Selecting a Container: Populates the Known Fields list. Container selection for source or destination is only available if the wizard cannot find known fields using the container defined in the step parameters.
- Contentserv Selection: Choose Contentserv as either the source or destination library, depending on your data flow.
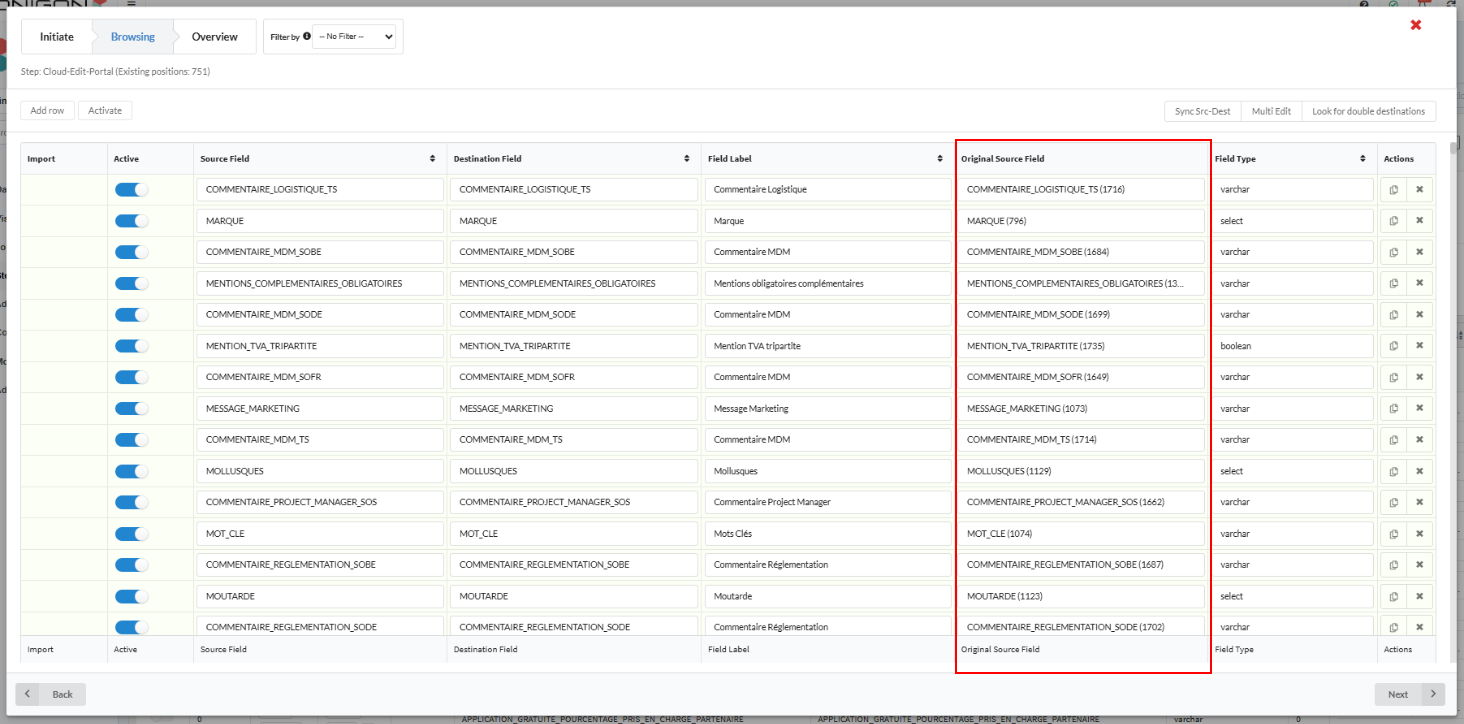
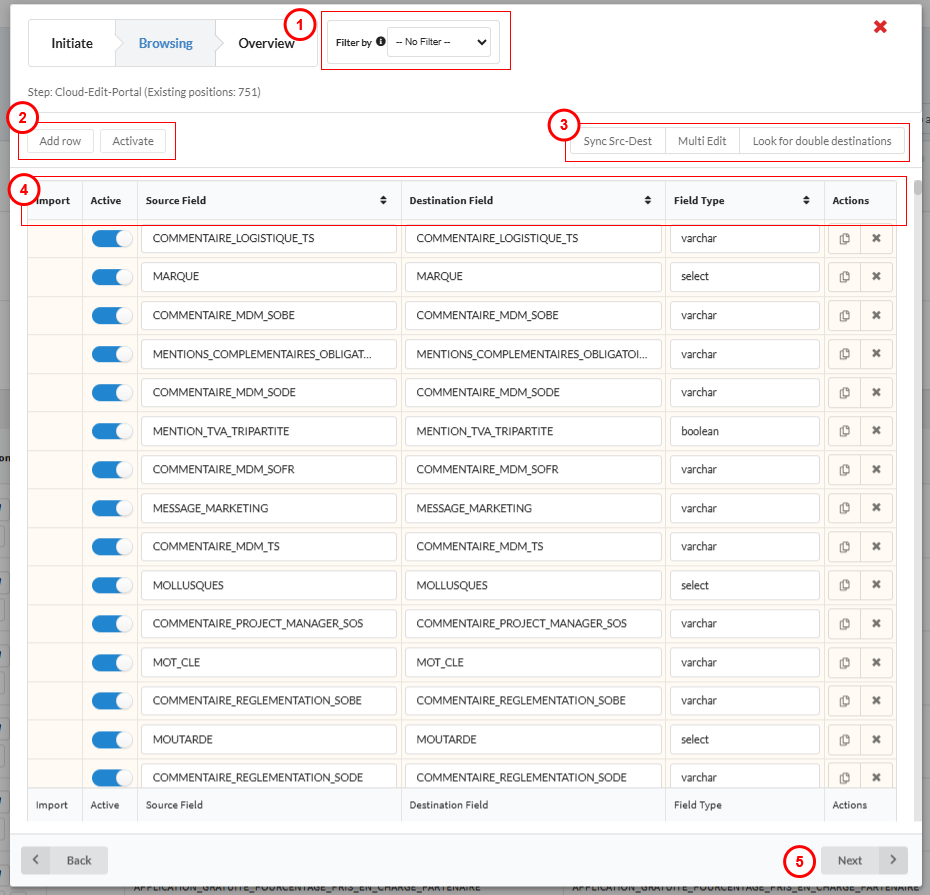
Browsing Pane
The Browsing Pane provides all necessary tools for managing and refining step positions and mappings.
Main Features
Mapping Fields
- The Source Field represents data from your chosen source. For Contentserv mapping options you will see the source field from Contentserv database, if you have chosen this selection.
- The Destination Field represents data from your chosen destination. For Contentserv mapping options you will see the destination field from Contentserv database, if you have chosen this selection.
- The Original Source Field column appears (the 6th column below) when data can be written back to the source (e.g., for Source2Edit Portal modules). The "Original Source Field" column is used because the "Source Field" column cannot serve as the write-back field when the module in use is Source2Edit-Portal.
- This column is only visible if:
- The destination is Contentserv CSConfig, and
- The web service is Source2Edit Portal.
- This column is only visible if:
Navigating the Browsing Pane
- Filtering options
- You can filter data by: Direction, Instance, Activation Status or Import Status. If contentserv is used, then contentserv related criteria will be available in the filter.
- Activate/Deactivate allows you to activate all lines, deactivation must be done individually (you can also activate or deactivate individual lines by selecting the toggle button next to each line). Add new rows with the Add Row button.
- Sync Source to Destination, Look for Double Destination, and Multi Edit
- Sync Source to Destination : Before copying, this function checks for a matching field between the source and destination. It can identify matches even when there are differences in letter casing (e.g., uppercase vs. lowercase) or when characters such as spaces and underscores differ.
- Copies source values into destination fields without the attribute ID number in brackets.
- If a new destination value is manually written the Import column automatically toggles on.
- This function only copies values that do not exist in the ADIB field list and matches field types according to Contentserv availability.
- Look for Double Destination
- click the Look for Double Destination button, it functions as a filter — displaying only the rows where the destination field is not unique. This allows you to easily review and manage duplicate destinations directly. Rule: Each destination must be unique.
- Multi Edit
- Opens a Multi Edit Window for bulk updates.
- Allows applying of one value across all selected attributes.
- Sync Source to Destination : Before copying, this function checks for a matching field between the source and destination. It can identify matches even when there are differences in letter casing (e.g., uppercase vs. lowercase) or when characters such as spaces and underscores differ.
- Colum Titles
- Import Column : if any mappings are not found you can insert them manually and the import column will automatically toggle on. If not toggled, new step positions that do not exist in the database will not be saved when clicking on the save button of the overview pane.
- Activate Toggle : allows you to activate the selected mapping.
- Source Field : reflects the chosen mapping for data source.
- Destination Field : reflects the chosen mapping for the data destination.
- Field Type : click on a field type to open a dropdown menus of predefined types. You can type to search your desired field type from the following list : date and time, date, float, integer, select, text, varchar, boolean, or array.
- Actions : Allows you to duplicate or delete mappings
- Next : allows you to move to overview pane to confirm your mapping. No mapping is saved until you have verified your choices and saved in the Overview pane.
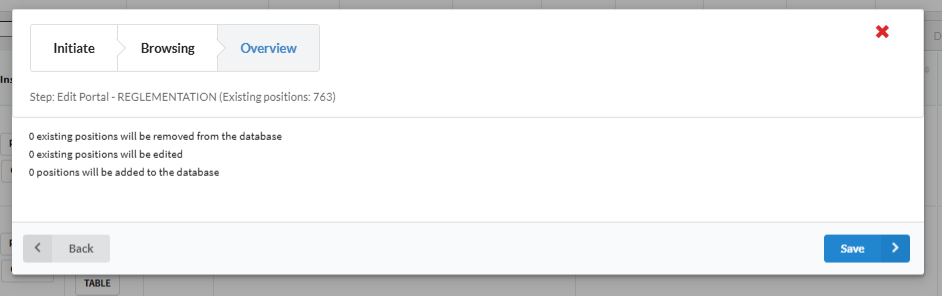
Overview Pane
The Overview Pane displays a summary of all modifications before finalizing changes.
Displayed Information
- Count of Edited Fields
- Count of Removed Fields
- Count of Newly Added Fields
This summary ensures transparency and validation before saving changes to the database. When you are ready to confirm your mapping press save.
Key Benefits and Best Practices
- Simplified data transformation and integration
- Intelligent duplicate detection and resolution
- Enhanced visibility and control through filtering and multi-edit options
- Validate field types to prevent import errors.
- Review the Overview Pane before saving to confirm all changes.